import Document, { Head, Html, Main, NextScript } from "next/document";

class CustomDocument extends Document {
  render(): JSX.Element {
    console.log("Document is running");
    return (
      <Html lang="ko">
        <Head>
          <link
            href="https://fonts.googleapis.com/css2?family=Noto+Sans+KR&display=swap"
            rel="stylesheet"
          />
        </Head>
        <body>
          <Main></Main>
          <NextScript></NextScript>
        </body>
      </Html>
    );
  }
}

export default CustomDocument;
//NextJS앱의 html 뼈대를 짜주는 역할
//안의 Main은 Nextjs가 앱 컴포넌트를 랜덩링 해주는 것.
//HTML 뼈대를 짜주는 역할을 하는 파일이라 서버에서 단 한번 실행 됨.
//<Main>안에서 _app.tsx가 들어간다.
_document.tsx의 역할. 이 페이지는 단 한번 렌더링 됨. 그리고 아래 html은 크롤라나 bot이 올 때 이미 완성되어있다. SEO에 좋다.
아래는 위치
_document.tsx
NextJS의 폰트 최적화는 구글 폰트에 한정되어있기 때문에 구글폰트 링크를 써야 함. 어떻게 최적화 해줄까? 개발자모드에선 확인 안됨. 빌드해야 함
일단 구글폰트를 불러오는 링크(<linkhref="https://fonts.googleapis.com/css2?family=Noto+Sans+KR&display=swap"rel="stylesheet"/>)에는 폰트를 불러올 링크들이 또 있다. 따라서 빌드 시에 이 링키들을 열어서 한군데 모아줌. 그러니 이미 폰트들을 불러와 두는거지. 두단계를 건너 뛴다고 보면 되나? 꽤나 도움이 될듯하다.
미들웨어란? Request ----> Server ----> 서버내 함수(handler = controler()) ----> DB
그런데 로그인이랑 인증 요청을 처리하려면 컨트롤러 전에 믿르웨어를 사용해야 함. Request ----> Server ----> 1. log() ----> 2. auth() -----> 서버내 함수(handler = controller()) ----> DB
아래 두개가 미들웨어 1. log(): 요청사항을 log해주는 함수 2. auth(): 인증쿠키 처리해주는 함 여기서 틀린게 없으면 인증 미들웨어가 controller에게 요청사항을 전달해줌
중간에 있느 소프트웨어지 어떤 중간에? 처음 유저가 보낸 request와 종착지(controller) 중간에 있는 함수!!!
node.js에서 많이 사용함. server 파일이 따로 있음. 이 파일안에 사용하고 싶은 미들웨어들을 정리해놓음
근데 next.js는 서버리스임. server파일 없다. 근데 미들웨어 사용 가능!!!
client/useUser hook 모든 페이지에 사용해야 하는데. 이런걸 미들웨어로 만들어야지 pages폴더 루트폴터 안에 미들웨어 함수 적으면 됨.(12.2.0부터 루트에) middleware라고 적음 됨. 코드를 어디에 적느냐에 따라 스코프 설정이 됨. 페이지 바꿀 때마다 동작하게 하고싶다? -> 루트폴더에 미들웨어 작성 또는 프로파일 폴더 안에서만 움직일 때 동작하게 하고싶다? 해당 폴더에 미들웨어 작성 https://nextjs.org/docs/messages/nested-middleware
import type { NextRequest, NextFetchEvent } from "next/server";

export function middleware(req: NextRequest, ev: NextFetchEvent) {
  if (req.nextUrl.pathname.startsWith("/about")) {
    // This logic is only applied to /about
  }

  if (req.nextUrl.pathname.startsWith("/dashboard")) {
    // This logic is only applied to /dashboard
  }
}
이제 그냥 루트에 있는 미들웨어 파일하나로 다 써야함. 경로로 구분 하면 됨.
middleware.ts라는 이름의 파일을 root에 만들어라.
middleware 1. API 핸들러에 요청 보낼 때도 실행 됨. 2. 페이지 이동할
19.1 Responses and Redirections
import { NextFetchEvent, userAgent } from "next/server";
import type { NextRequest } from "next/server";
import { NextResponse } from "next/server";

export function middleware(req: NextRequest, ev: NextFetchEvent) {
  const ua = userAgent(req);
  // console.log(ua);
  // if (ua?.isBot) {
  //   return new Response("Please don't be bot"); //no longer works
  // }
  if (!req.url.includes("/api")) {
    if (!req.url.includes("/enter") && !req.cookies.has("carrotsession")) {
      return NextResponse.redirect(new URL("/enter", req.url));
    }
    // if (req.nextUrl.pathname.startsWith("/chats")) {
    //   console.log("chats");
    // }
  }
  // req.geo?.country
  // hosting provider 에 따라 다름.
}
cloudflareId: uid, //비디오 보기 위함
cloudflareKey: streamKey, // 방송의 오너에게 줘야 함.
cloudflareUrl: url,// 방송의 오너에게 줘야 함.
sugar댓글

Using the Stream player (스트림 플레이어 사용)
아래 iframe 태그를 사용하여 웹 페이지에 스트림 플레이어를 넣을 수 있습니다.
$VIDEOID에는 비디오 UID(또는 서명된 토큰)을 지정해줍니다.
```
< iframe
src="https://iframe.videodelivery.net/$VIDEOID"
style="border: none"
height="720"
width="1280"
allow="accelerometer; gyroscope; autoplay; encrypted-media; picture-in-picture;"
allowfullscreen="true"
>< /iframe>
```
https://developers.cloudflare.com/stream/viewing-videos/using-the-stream-player/

@cloudflare/stream-react
Cloudflare Stream용 공식 React 컴포넌트
https://www.npmjs.com/package/@cloudflare/stream-react

Displaying thumbnails (썸네일 표시)
방법 1) 즉석에서 썸네일 생성
https://videodelivery.net/${VIDEO_ID}/thumbnails/thumbnail.jpg?time=68s&height=270
방법 2) API를 사용하여 기본 썸네일 타임스탬프 설정
방법 3) 애니메이션 썸네일 생성
https://developers.cloudflare.com/stream/viewing-videos/displaying-thumbnails/
스트리머는 아래 사진의 주황색 부분이 보일텐데 URL,Key 갖고 하면 된다. OBS나 LiveNow에 해당 정보 넣으면 됨.
By sugar 댓글

View by live input uid
/lifecycle 엔드포인트에 GET 요청을 보내 비디오 ID 또는 라이브 입력 uid에 대한 추가 데이터를 가져올 수 있습니다.
https://developers.cloudflare.com/stream/stream-live/watch-live-stream/#view-by-live-input-uid

Live viewer counts for third party players (실시간 시청자 수 보기)
스트림 플레이어는 기본적으로 실시간 시청자 수를 완벽하게 지원합니다. third party player와 함께 사용할 라이브 비디오의 시청자 수를 얻으려면 /views 엔드포인트에 GET 요청을 하십시오.
```
// request
https://videodelivery.net/55b9b5ce48c3968c6b514c458959d6a/views

// response
{"liveViewers": 113}
```
https://developers.cloudflare.com/stream/getting-analytics/live-viewer-count/

View by video id (녹화된 비디오 정보 가져오기)
https://developers.cloudflare.com/stream/stream-live/watch-live-stream/#view-by-video-id

Replaying recordings
https://developers.cloudflare.com/stream/stream-live/watch-live-stream/#replaying-recordings
18 Code Challenge 이제 구현은 다 끝났고 nextjs 배워보자. 그 전에, 1. 판매자와 대화하기(Talk to seller), 2. 예약중 기능, 예약날자 지나면 리뷰남겨달라는 버튼을 생성해주자.?실제 당근처럼 하면 되겠지. 인런거 연습하면 매우 좋을듯. 꼭 해야 할듯.
Improved Performance: Always serve correctly sized image for each device, using modern image formatsVisual Stability: Prevent Cumulative Layout Shift automatically Faster Page Loads: Images are only loaded when they enter the viewport, with optional blur-up placeholdersAsset Flexibility: On-demand image resizing, even for images stored on remote server
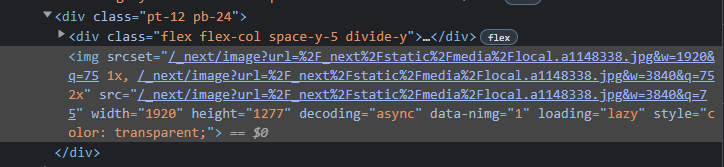
16.1 Local Images local image와 remote image 다루는게 다르다. blurry 버전의 이미지 기능은 local image만 가능. 파일을 갖고있어야 함. _next/image API Handler로 이미지
http://127.0.0.1:3000/_next/image?url=%2F_next%2Fstatic%2Fmedia%2Flocal.a1148338.jpg&w=3840&q=75 뒤의 Q는 퀄리티. 1~100까지.
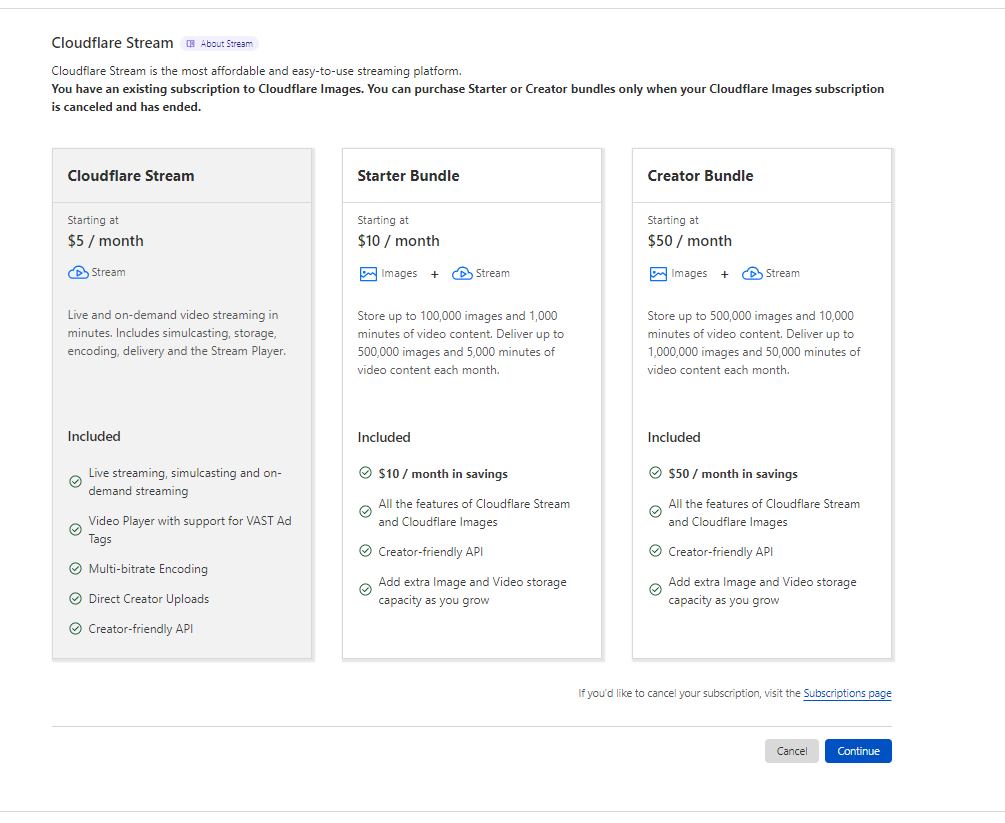
15.0 Introduction cloudfare images로 이미지를 추가해보자~ egress cost = 대역폭(bandwidth에 요금 내는거) 이미지 100,000개에 5달러. 이미지 resizing,최적화에도 돈 안받음.
15.1 Image Preview blob: Binary Large Object A binary large object is a collection of binary data stored as a single entity. Blobs are typically images, audio or other multimedia objects, though sometimes binary executable code is stored as a blob. Wikipedia 하나의 entity로 저장된 커다란 이진수 파일임. 주로 멀티미디어 객체가 되겠다.
API Token을 사용하는 방식을 이용했을 때 우리 서버가 있다면(우린serverless지) 유저가 올린 사진을 우리 서버에 올리고, 우리서버에서 cloudflare에 올려야 함. 서버가 있다면 이상한 방법이 아니긴 한데 우리 서버에 data가 왔다갔다 하는게 다 돈임. 그러니 유저 브라우저가 하게 하자. 유저에게 secure URL을 주고, 유저는 그 URL에 업로드하게 한다. token같은거 유출 될일 없다.
Direct Creator Upload 작동원리: 1. 유저 사진 업로드 원함 2. 백엔드에서 key같은걸로 안전하게 CloudFlare(CF)에 URL달라고 요청 3. CF는 빈파일의 URL을 만들어서 백엔드에 주고 백엔드는 유저에게 . 4. 그럼 유저는 그 URL을 이용해 이미지를 direct로 올린다.
14.0 Upload Form 늘 하던 패턴의 반복. Model -> Form(useForm()) -> useMutation() 14.1 Detail Page 14.2 Send Message 14.3 See Message 14.4 Mutations and Refresh 14.5 Seeding - prisma의 seeding 가짜 데이트베이스 많이 생성 하는 법.
3. npm i ts-node 설치(https://www.npmjs.com/package/ts-node) 이게 뭐냐? TypeScript execution and REPL for node.js, with source map and native ESM support. REPL이란 : Node. js Read-Eval-Print-Loop (REPL) is an easy-to-use command-line tool, used for processing Node. js expressions. It captures the user's JavaScript code inputs, interprets, and evaluates the result of this code. It displays the result to the screen, and repeats the process till the user quits the shell. 브라우저 개발자 모드에 있는 console대신 쓸수 있는 듯
이거말하는듯
5. package.json맨 아래에 해당 명령어 추
6. 그리고 바로 npx prisma db seed 명령어 치면 에러 남. SyntaxError: Cannot use import statement outside a module
대신, pool time out 때문에 그렇다. Pool은 데이터 모으는거고, pool timeout은 이게 정해진 시간 넘도록 특정 쿼리 처리 못하면 exception을 던지고 다음 쿼리로 감. The default connection pool timeout is 10 seconds. If the query engine does not process a particular query within that time, it throws an exception and moves on to the next query in the queue. 근데 serverless가 아닌 일반 서버는 데이터베이스가 허용하는 연결의 수 제한이 매우 작음 근데 우리는 planetscale이 1000개의 동시연결이 가능하단걸 prisma에게 알려주지 않았다. 그래서 prisma에서 시간 초과가 되었다. 우린 일반 DB보다 훨씬 빨랐기 때문에!
SELECT `carrot-market`.`Stream`.`id`, `carrot-market`.`Stream`.`created`, `carrot-market`.`Stream`.`updated`, `carrot-market`.`Stream`.`name`, `carrot-market`.`Stream`.`description`, `carrot-market`.`Stream`.`price`, `carrot-market`.`Stream`.`userId` FROM `carrot-market`.`Stream` WHERE 1=1 ORDER BY `carrot-market`.`Stream`.`id` ASC LIMIT ? OFFSET ?
Review 모델은 User를 두번 가리켜야 한다. 내가 작성한 리뷰, 나에게 작성된 리뷰. 이러면 관계가 애매하다고 경고가 뜨는데 이때, relation에 name을 지어주면 된다. 그러면 user.writtenRiviews 이런 식으로 접근 가능.
모델만들기 -> 기능 만들기 -> 다른 모델 만들기 -> 다른 기능 만들기(x) 모델들 다 만들기 -> 기능 구현해나가기(o)
Enum - model의 모든 필드들이 같고 이름만 다를 때 사용 구조상 Purchase, Fav, Sale이 같음. 그럼 다음처럼 쓰면 된다.
SQL 레벨에선 enum이 저렇게 보인다.
13.1 Reviews 사용하던 모델(레코드를 생성했던) 새로운 필드를 추가하면 당연히 에러가 뜨겠지?
그러면 선택은 3가지
1. 기존 DB모두 삭제 2. 새로운 필드를 필수가 아닌 것으로 두기 scoreInt? 3. 기본값 두기 scoreInt@default(1)
13.2 Handlers 만약 Record라는 모델에 enum을 쓰는방식을 썼다면 다음 사진처럼 작성하면 됨.
13.3 Profile Page 13.4 Sales, Purchases, Favorites 13.5 Edit Profile part One TODO ENTER 페이지 빼고 모두 useUser사용해서 로그인 여부 체크해야 함. 로그인 이용자들만 볼 수 있게. https://react-hook-form.com/api/useform/formstate 13.6 Edit Profile part Two